一、简介
1)容器网络基本概念
- Linux Network Namespace
- linux 网络设备:network interface device,loopback device,bridge device,veth device,tun/tap device,vxlan device,ip tunnel device 等等可完成网络数据包收发,提供额外修改数据包功能设备
- linux 路由表(三层 ip 包路由寻址功能),arp 表(提供 ip 对应的 mac 信息),fdb(提供基于 mac 转发功能中 mac 地址对应的网络接口) 等
- linux 协议栈:对网络协议包的封装与解析,如二层 ethernet 包,三层 ip icmp包,四层 tcp/udp 包等
- linux iptable:基于内核模块 netfilter 完成对 linux 的 firewall 管理,例如控制 ingress 与 engress,nat 地址转换,端口映射等
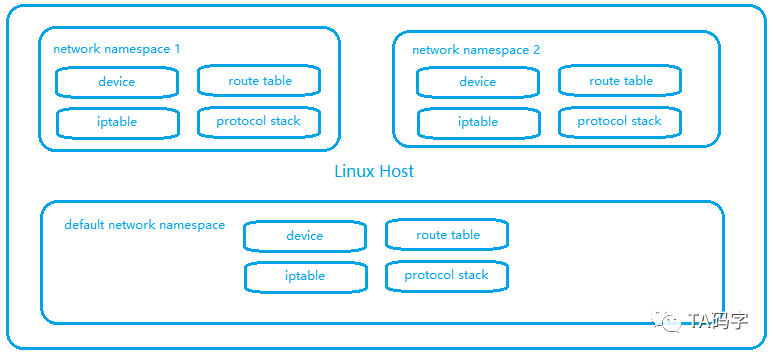
linux 不仅仅只有 network namespace 用来进行网络隔离,还有 pid namespace 用来隔离进程,user namespace 用来隔离用户,mount namespace 用来隔离挂载点,ipc namespace 用来隔离信号量和共享内存等,uts namespace 用来隔离主机名和域名。
配合 cgroup 控制组,限制 cpu,memory,io 等资源。构成容器的底层实现
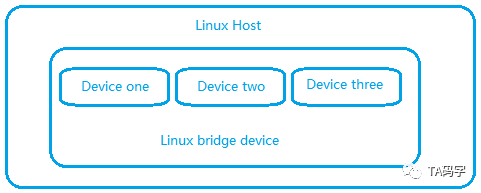
- Linux Bridge Device
linux 网桥设备,可以附加 attach 多个 linux 从设备。类似于一个内部虚拟二层交换机,可以进行二层数据包广播。但是注意的是linux bridge设备可以有自己的ip地址。也就是说,多个linux网络设备attach到一个bridge上,那么这些网络设备的ip地址将会失效(只有二层功能),当一个设备收到数据包的时候,bridge会把数据包转发到其它所有attach到bridge上的从设备,从而实现广播的效果。
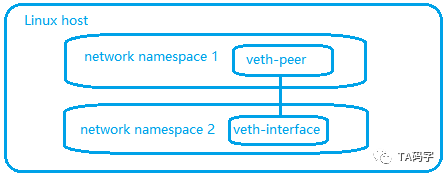
- Linux Veth Device
总是成对出现,一对 peer 两个端点,数据包从一个 peer 流入并流出到另一个 peer。veth pair 可以跨 network namespace。
2)k8s 集群容器网络通讯方式
- 网络负载方式
kube-proxy 组件启动参数控制(–proxy-module=ipvs)
iptables:默认
ipvs:v1.11 版本及之后
- 网络通讯方式
underlay:flannel host-gw,calico bgp 等(需开启 ip_forword 内核参数)
overlay:flannel vxlan,calico ipip,flannel udp(一般不使用) 等
3)测试环境主机信息
| 宿主机 IP | 角色 | 容器 CIDR | CNI 网卡地址 | Flannel.1 vtep 设备 |
|---|---|---|---|---|
| 192.168.205.4 | master | 10.42.0.0/24 | 10.42.0.1 | 10.42.0.0 |
| 192.168.205.3 | node1 | 10.42.1.0/24 | 10.42.1.1 | 10.42.1.0 |
| 192.168.205.5 | node2 | 10.42.2.0/24 | 10.42.2.1 | 10.42.2.0 |
二、宿主机内网络
1)docker 容器的四种网络类型
- bridge 模式(默认):–net=bridge
宿主机创建 docker0 网卡,使用独立 IP 段,为每个容器分配改网段 IP,容器之间通过该网桥进行通信(类似二层交换机)
![]()
自定义 bridge 网络:宿主机范围创建独立的 network namespace
![]()


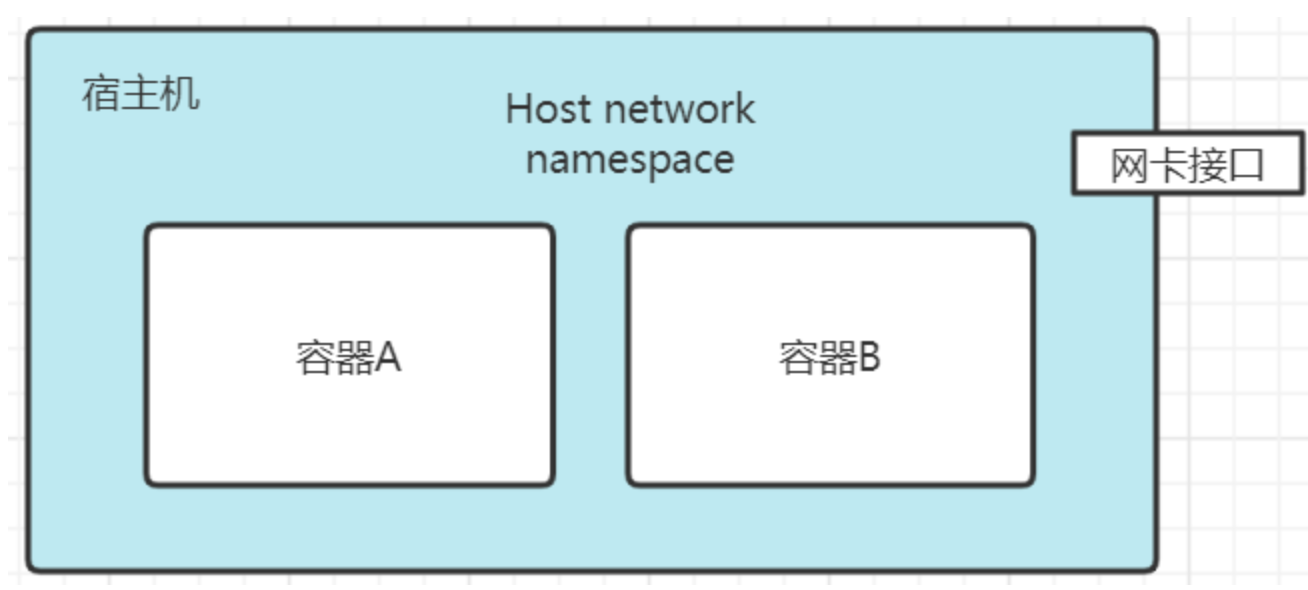
- host 模式:–net=host
共享宿主机网络,容器暴露端口时占用宿主机端口。网络模式简单,性能较好,一般用于单容器服务。
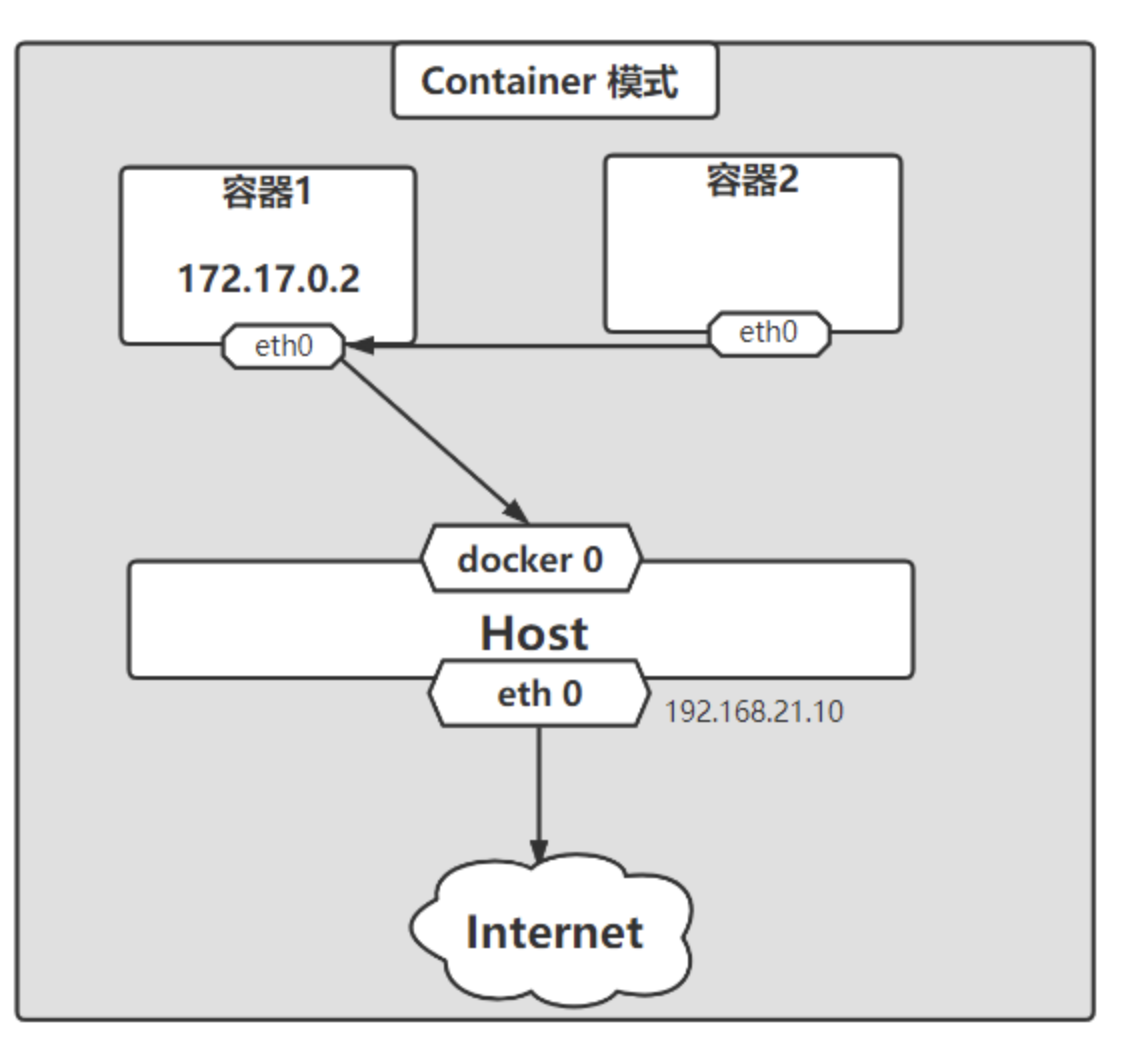
- contaniner 模式:–net=container:name or id
指定新创建的容器共享已存在的容器 Network namespace(k8s 中 pod 即为多个容器共享 network namespace)。除了网络,文件系统 进程等都为隔离,容器间进程可以通过 lo 网卡通信
- none 模式:容器有独立的 Network namespace ,但没有任何网络配置,可自定义进行网络配置。一般用于 CPU 密集型任务,计算完成保留磁盘无需对外网络
2)docker 宿主环境中容器网络
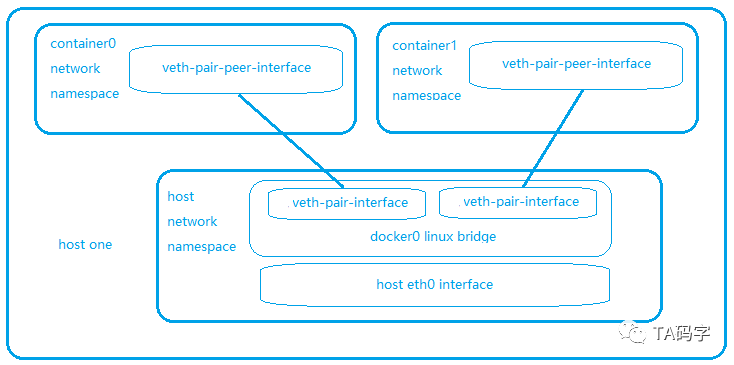
- 每一个container都有一个network namespace,然后拥有container自己的网络设备,路由表,arp表,协议栈,iptable等,各个container的network namespace相互隔离。
- 在宿主的default netwok nemespace中会有一个linux bridge设备,一般名称为docker0。
- 每一个container对应一个veth pair设备,这个设备的一端在container的network namespace里,另一端attach到宿主networkwork namespace的docker0 linux bridge上。
- 这样在宿主环境里,就好像有一个二层交换机(docker0 bridge),把宿主内的所有container连接起来。所以,在宿主内的container都是可以直接相互访问的,而且是直连的方式
1 | # 相关命令 |
三、Service:cluster ip 实现原理
1)cluster ip 如何访问
k8s 集群中服务需要相互访问,一般为之创建相应的 service,集群内部访问时一般使用 cluster ip。一个 cluster ip 后面会关联多个 endpoints(实际的 pod 地址)。对于 cluster ip 的访问,也就是实现了对 cluster ip 关联的多个 endpoints 负载均衡访问(负载方式为 iptables 或 ipvs)
2)iptables 方式
查看 service 信息:cluster ip 以及关联的 endpoints ip
1
2
3
4
5
6
7
8
9
10
11
12
13
14kubectl describe service nginx-test
Name: nginx-test
Namespace: default
Labels: app=nginx-test
Annotations: <none>
Selector: app=nginx-test
Type: ClusterIP
IP Family Policy: SingleStack
IP Families: IPv4
IP: 10.43.6.58
IPs: 10.43.6.58
Port: 80-80 80/TCP
TargetPort: 80/TCP
Endpoints: 10.42.1.6:80,10.42.2.6:80查看宿主机 iptables
1
2
3
4
5iptables -nvL -t nat |head
Chain PREROUTING (policy ACCEPT 0 packets, 0 bytes)
pkts bytes target prot opt in out source destination
298 19090 KUBE-SERVICES all -- * * 0.0.0.0/0 0.0.0.0/0 /* kubernetes service portals */
202 12456 CNI-HOSTPORT-DNAT all -- * * 0.0.0.0/0 0.0.0.0/0 ADDRTYPE match dst-type LOCAL对于 PREROUTING chain 中,所有的流量都走到了 KUBE-SERVICES 这个 target 中。请注意 PREROUTING chain 是流量到达之后的第一个入口。如果在 pod 里运行命令 curl http://10.43.6.58,根据容器内部路由表,数据包应该是这样的流动:
- 在pod中,根据路由表发现cluster ip(10.43.6.58)走默认路由,选择了默认网关。
- 在pod中,默认网关的ip地址就是宿主netwok namespace的 docker0 或 cni0 的ip地址,并且默认网关为直连路由。
- 在pod中,根据路由表,使用eth0 device发送数据,eth0本质是veth pair在pod network namespace的一端,另一端attach在宿主netwok namespace的 docker0 或 cni0 bridge上。
- veth pair,数据从pod network namespace的一端发出,进入到了attached到docker0 或 cni0 bridge上的另一端。
- docker0 或 cni0 bridge收到数据之后,自然就来到了host network namesapce 的 PREROUTING chain
查看 KUBE-SERVICES target
1
2
3
4
5
6
7
8iptables -nvL -t nat | grep 10.43.6.58
0 0 KUBE-SVC-7CWUT4JBGBRVUN2L tcp -- * * 0.0.0.0/0 10.43.6.58 /* default/nginx-test:80-80 cluster IP */ tcp dpt:80
iptables -nvL -t nat | grep KUBE-SVC-7CWUT4JBGBRVUN2L -A 5
Chain KUBE-SVC-7CWUT4JBGBRVUN2L (1 references)
pkts bytes target prot opt in out source destination
0 0 KUBE-SEP-U2YYZT2C3O6VM4EV all -- * * 0.0.0.0/0 0.0.0.0/0 /* default/nginx-test:80-80 -> 10.42.1.6:80 */ statistic mode random probability 0.50000000000
0 0 KUBE-SEP-GWUIQWA2TNZI4ESX all -- * * 0.0.0.0/0 0.0.0.0/0 /* default/nginx-test:80-80 -> 10.42.2.6:80 */在 KUBE-SERVICES target中我们可以看到目标地址为cluster ip 10.43.6.58 的匹配target 为 KUBE-SVC-7CWUT4JBGBRVUN2L。
KUBE-SVC-7CWUT4JBGBRVUN2L 链信息:- 存在两个target (对应两个 Pod )KUBE-SEP-U2YYZT2C3O6VM4EV 和 KUBE-SEP-GWUIQWA2TNZI4ESX
- 在 KUBE-SEP-U2YYZT2C3O6VM4EV 中有statistic mode random probability 0.5。0.5 利用了iptable内核随机模块,随机比率为0.5,也就是50%
- 由于一半随机比率进入 KUBE-SEP-U2YYZT2C3O6VM4EV target, 因此另一个 target 的随机比率也为50%,实现负载均衡
查看 KUBE-SEP-U2YYZT2C3O6VM4EV 和 KUBE-SEP-GWUIQWA2TNZI4ESX
1
2
3
4
5
6
7
8
9
10
11iptables -nvL -t nat | grep KUBE-SEP-U2YYZT2C3O6VM4EV -A 3
Chain KUBE-SEP-U2YYZT2C3O6VM4EV (1 references)
pkts bytes target prot opt in out source destination
0 0 KUBE-MARK-MASQ all -- * * 10.42.1.6 0.0.0.0/0 /* default/nginx-test:80-80 */
0 0 DNAT tcp -- * * 0.0.0.0/0 0.0.0.0/0 /* default/nginx-test:80-80 */ tcp to:10.42.1.6:80
iptables -nvL -t nat | grep KUBE-SEP-GWUIQWA2TNZI4ESX -A 3
Chain KUBE-SEP-GWUIQWA2TNZI4ESX (1 references)
pkts bytes target prot opt in out source destination
0 0 KUBE-MARK-MASQ all -- * * 10.42.2.6 0.0.0.0/0 /* default/nginx-test:80-80 */
0 0 DNAT tcp -- * * 0.0.0.0/0 0.0.0.0/0 /* default/nginx-test:80-80 */ tcp to:10.42.2.6:80在这2个target中我们可以看到:
- 分别做了MASQ操作,这个应该是出站engress流量(限定了source ip),不是我们的入站ingress流量。
- 做了DNAT操作,把原来的cluster ip给DANT转换成了pod的ip 10.42.1.6和10.42.2.6。把原来的port转换成了80 port
- 经过这个一系列iptable的target我们的原始请求10.42.1.6:80就变成了10.42.1.6:80或者10.42.2.6:80,而且两者转变的机率各是50%。
- 根据iptable,经过PREROUTING chain发现DNAT之后的10.42.1.6或者10.42.2.6不是本地的ip(这两个ip是pod的ip,当然不会在host network namespace里)。所以就走到了Forwarding chain中,根据host network namespace的路由表来决定下一跳地址
1 | 查看路由表信息 |
- clusterip 类型 service 总结
- 流量从pod network namespace中走到host netwok namespace的docker0中。
- 在host netwok namespace的PREROUTING chain中会经过一系列target。
- 在这些target里根据iptable内核随机模块来实现匹配endpoint target,随机比率为均匀分配,实现均匀的负载均衡。内核实现负载均衡,无法自定义负载均衡算法。
- 在endpoint target里实现了DNAT,也就是将目标地址cluster ip转化为实际的pod的ip。
- cluster ip是虚拟ip,不会和任何device绑定。
- 需要host开启路由转发功能(net.ipv4.ip_forward = 1)。
- 数据包在host netwok namespace中经过转换以及DNAT之后,由host network namespace的路由表来决定下一跳地址
3)ipvs 方式
- https://mp.weixin.qq.com/s?__biz=MzI0MDE3MjAzMg==&mid=2648393263&idx=1&sn=d6f27c502a007aa8be7e75b17afac42f&chksm=f1310b40c64682563cfbfd0688deb0fc9569eca3b13dc721bfe0ad7992183cabfba354e02050&scene=178&cur_album_id=2123526506718003213#rd
- https://icloudnative.io/posts/ipvs-how-kubernetes-services-direct-traffic-to-pods/
四、Service:nodeport 实现原理
1)nodeport ip 如何访问
通过访问宿主机端口 –> cluster ip 路径(端口范围:30000-32767)
2)iptables 方式
查看 service 信息
1
2
3
4
5
6
7
8
9
10
11
12
13
14
15
16
17
18kubectl describe service nginx-test
Name: nginx-test
Namespace: default
Labels: app=nginx-test
Annotations: <none>
Selector: app=nginx-test
Type: NodePort
IP Family Policy: SingleStack
IP Families: IPv4
IP: 10.43.6.58
IPs: 10.43.6.58
Port: 80-80 80/TCP
TargetPort: 80/TCP
NodePort: 80-80 32506/TCP
Endpoints: 10.42.1.6:80,10.42.2.6:80
Session Affinity: None
External Traffic Policy: Cluster
Events: <none>对node port类型的service来说,访问host的port就访问到了这个服务。所以从host网络角度来看,当host收到数据包的时候应该是进入host network namespace的PREROUTING chain中,查看host network namespace的PREROUTING chain。
查看宿主机 iptables
1
2
3
4iptables -nvL -t nat |head
Chain PREROUTING (policy ACCEPT 0 packets, 0 bytes)
pkts bytes target prot opt in out source destination
323 20898 KUBE-SERVICES all -- * * 0.0.0.0/0 0.0.0.0/0 /* kubernetes service portals */根据规则,对于PREROUTING chain中,所有的流量都走到了KUBE-SERVICES这个target中。
查看 KUBE-SERVICES target
1
2
3
4iptables -nvL -t nat |grep KUBE-SERVICES -A 10
Chain KUBE-SERVICES (2 references)
pkts bytes target prot opt in out source destination
0 0 KUBE-SVC-7CWUT4JBGBRVUN2L tcp -- * * 0.0.0.0/0 10.43.6.58 /* default/nginx-test:80-80 cluster IP */ tcp dpt:80在KUBE-SERVICES target中当访问 nginx-test-service 在host上的 32506 时候,根据规则匹配到了 KUBE-NODEPORTS 这个target。
1
2
3
4iptables -nvL -t nat |grep KUBE-NODEPORTS -A 3
Chain KUBE-NODEPORTS (1 references)
pkts bytes target prot opt in out source destination
2 124 KUBE-EXT-7CWUT4JBGBRVUN2L tcp -- * * 0.0.0.0/0 0.0.0.0/0 /* default/nginx-test:80-80 */ tcp dpt:32506在KUBE-NODEPORTS target中可以看到当访问 32506 端口时到 KUBE-EXT-7CWUT4JBGBRVUN2L 这个 target
查看 KUBE-EXT-7CWUT4JBGBRVUN2L target
1
2
3
4
5
6
7
8
9
10
11
12
13
14
15
16
17iptables -nvL -t nat |grep KUBE-EXT-7CWUT4JBGBRVUN2L -A 5
Chain KUBE-EXT-7CWUT4JBGBRVUN2L (1 references)
pkts bytes target prot opt in out source destination
2 124 KUBE-MARK-MASQ all -- * * 0.0.0.0/0 0.0.0.0/0 /* masquerade traffic for default/nginx-test:80-80 external destinations */
2 124 KUBE-SVC-7CWUT4JBGBRVUN2L all -- * * 0.0.0.0/0 0.0.0.0/0
iptables -nvL -t nat |grep KUBE-MARK-MASQ -A 3
Chain KUBE-MARK-MASQ (20 references)
pkts bytes target prot opt in out source destination
2 124 MARK all -- * * 0.0.0.0/0 0.0.0.0/0 MARK or 0x4000
iptables -nvL -t nat |grep KUBE-SVC-7CWUT4JBGBRVUN2L -A 5
Chain KUBE-SVC-7CWUT4JBGBRVUN2L (2 references)
pkts bytes target prot opt in out source destination
0 0 KUBE-MARK-MASQ tcp -- * * !10.42.0.0/16 10.43.6.58 /* default/nginx-test:80-80 cluster IP */ tcp dpt:80
1 64 KUBE-SEP-U2YYZT2C3O6VM4EV all -- * * 0.0.0.0/0 0.0.0.0/0 /* default/nginx-test:80-80 -> 10.42.1.6:80 */ statistic mode random probability 0.50000000000
1 60 KUBE-SEP-GWUIQWA2TNZI4ESX all -- * * 0.0.0.0/0 0.0.0.0/0 /* default/nginx-test:80-80 -> 10.42.2.6:80 */在 KUBE-EXT-7CWUT4JBGBRVUN2L 中可以看到两个 target
- KUBE-MARK-MASQ 打标记,无 nat target
- KUBE-SVC-7CWUT4JBGBRVUN2L target 进入 cluster ip 规则,重复第三部分规则,最终流量进入 Pod
nodeport 类型 service 总结:
- 在host netwok namespace的PREROUTING chain中会匹配KUBE-SERVICES target。
- 在KUBE-SERVICES target会匹配KUBE-NODEPORTS target
- 在KUBE-NODEPORTS target会根据prot来匹配KUBE-SVC-XXX target
- KUBE-SVC-XXX target就和第三部分中的cluster-ip类型service一样,最终流量进入到 Pod 中
3)ipvs 方式
- https://mp.weixin.qq.com/s?__biz=MzI0MDE3MjAzMg==&mid=2648393266&idx=1&sn=34d2a21b06d6e9ef4f4f7415f2cad567&chksm=f1310b5dc646824b45cbfc8cf25b0f2449f7223006b684da06ba58d95a2be7a3f0ad7aa6c4b9&scene=178&cur_album_id=2123526506718003213#rd
- https://icloudnative.io/posts/ipvs-how-kubernetes-services-direct-traffic-to-pods/
五、Service:ipvs 与 iptables 对比
基于 ipvs 的 k8s 网络负载要求:
- linux 内核高于2.4.x
- 在 kube-proxy 网络组件中启动参数加入–proxy-mode=ipvs
- 安装 ipvsadm 工具(可选),用于操作管理 ipvs 规则
两者都是采用linux内核模块完成负载均衡和endpoint的映射,所有操作都在内核空间完成,没有在应用程序的用户空间。
iptable方式依赖于linux netfilter/iptable内核模块。
ipvs方式依赖linux netfilter/iptable模块,ipset模块,ipvs模块。
iptable方式中,host宿主中ipatble的entry数目会随着service和对应endpoints的数目增多而增多。举个例子,比如有10个cluster ip类型的service,每个service有6个endpoints。那么在KUBE-SERVICES target中至少有10个entries(KUBE-SVC-XXX)与10个service对应,每个KUBE-SVC-XXX target中会有6个KUBE-SEP-XXX与6个endpoints来对应,每个KUBE-SEP-XXX会有2个enrties来分别做mark masq和DNAT,这样算起来至少有1062=120个entries在iptable中。试想如果application中service和endpoints数目巨大,iptable entries也是非常庞大的,在一定情况下有可能带来性能上的问题。
ipvs方式中host宿主中iptable的entry数目是固定的,因为iptable做匹配的时候会利用ipset(KUBE-CLUSTER-IP或者KUBE-NODE-PORT-TCP)来匹配,service的数目决定了ipset的大小,并不会影响iptable的大小。这样就解决了iptable模式下,entries随着service和endpoints的增多而增多的问题。
对于负载均衡,iptable方式采用random模块来完成负载均衡,ipvs方式支持多种负载均衡,例如round-robin,least connection,source hash等(可参考http://www.linuxvirtualserver.org/),并且由kubelet启动参数--ipvs-scheduler控制。
对于目标地址的映射,iptable方式采用linux原生的DNAT,ipvs方式则利用ipvs模块完成。
ipvs方式会在host netwok namespace中创建网络设备kube-ipvs0,并且绑定了所有的cluster ip,这样保证了cluster-ip类型的service数据进入INPUT chain,从而让ipvs来完成负载均衡和目标地址的映射。
iptable方式不会在host netwok namespace中创建额外的网络设备。
iptable方式数据在host network namespace的chain中的路径是:PREROUTING–>FORWARDING–>POSTROUTING 在PREROUTING chain中完成负载均衡,mark masq和目标地址映射。
ipvs方式数据在host network namespace的chain中的路径是:PREROUTING–>INPUT–>POSTROUTING 在PREROUTING chain中完成mark masq SNAT,在INPUT chain利用ipvs完成负载均衡和目标地址映射。
iptable和ipvs方式在完成负载均衡和目标地址映射后都会根据host network namespace的路由表做下一跳路由选择。
六、跨主机网络通信:flannel 组件
1)flannel underlay 网络:host-gw 方式
underlay 网络概念与配置
概念:underlay 网络在通讯过程没有额外封包,通过将容器的宿主机作为路由实现数据包转包
配置方式:略
service 与 Pod 对应信息
1 | kubectl describe service nginx-test |
数据包走向分析,从10.42.0.65请求10.42.1.9
- 数据包从源 pod 到宿主机
当在pod 10.42.0.65里向pod 10.42.1.9里发送数据包的时候,pod 10.42.0.65的网卡是veth的一个端点。根据pod network namespace中的路由规则,数据一定是发送到10.42.0.1,也就是宿主network namespace的cni0 linux bridge设备。由于pod 10.42.0.65网卡veth另一个端点attach在cni0 bridge设备上,所以数据被cni0 bride接收,也就是数据从pod的network namesapce流动到了host的network namespace里。
- 数据包在源 pod 宿主机中的路由
由于数据包的目标ip地址是10.42.1.9,而源pod 10.42.0.65的宿主ip是192.168.205.4。宿主机上开启了转发功能(net.ipv4.ip_forward = 1),所以主机发现目标ip 10.42.1.9不是自己的ip时候,就对这个数据包做路由转发。查看宿主192.168.205.4的路由表
1 | ip addr |grep 192.168.205.4 |
在路由表里发现10.42.1.0/24网段的数据下一跳是192.168.205.3,也就是目标pod 10.42.1.9的宿主机器。所以进行arp目标mac地址封包,将数据发往192.168.205.3。注意目标pod的下一跳地址是目标pod所在的host,也就是说数据会从原始pod所在的host通过下一跳发往目标pod所在的host。即是原始pod的host必须和目标pod的host在同一个二层网络里,因为只有这样才可以下一跳路由可达。这个也是flannel的underlay网络host gw方式的限制,既要求所有的k8s worker node节点都在同一个二层网络里(可以认为是在同一个ip子网)。
- 数据包在目标 pod 宿主机中的路由
当数据包路由到目标pod 10.42.1.9的host 192.168.205.3的时候(通过二层交换),目标pod宿主机上开启了转发功能(net.ipv4.ip_forward = 1),所以主机发现目标ip 10.42.1.9 不是自己的ip时候,就对这个数据包做路由转发。查看宿主192.168.205.3的路由表
1 | ip addr |grep 192.168.205.3 |
在路由表里发现10.42.1.0/24网段的数据下一跳是直连路由,由设备cni0 网卡转发。cni 网卡 10.42.1.1 作为linux bridge,会把数据通过veth pair从host network namespace发送到目标pod的10.42.1.9的network namespace里。然后由内核交给应用程序处理,从而完成了pod到pod的通讯。可以使用 kubectl debug 查看路由经过节点
1 | kubectl debug -it nginx-test-7646687cc4-z8xnq --image=busybox -- /bin/sh |
flannel underlay(host-gw 方式)总结
- 从源pod的network namespace到host network namespace的cni0 linux bridge上。
- 在源pod所在的host里做三层路由选择,下一跳地址为目标pod所在的host。
- 数据包从源pod所在的host发送到目标pod所在的host。(二层 mac 封装数据包)
- 在目标pod所在的host里做三层路由选择,本地直连路由到目标pod里。
- 要求所有的节点必须开启路由转发功能(net.ipv4.ip_forward = 1)
- 要求所有的节点都在同一个二层网络里,来完成目标pod所在host的下一跳路由
2)flannel overlay 网络:vxlan 方式
overlay 网络概念与配置
- 概念
vxlan 是一种overlay 网络技术,意在利用在三层网络之上构建二层网络。对于二层网络一般采用 vlan 技术来隔离,不过 vlan 在数据包里总共4个字节,有12bit用来标识不同的二层网络,这样总共可以有4000多个 vlan。而 vxlan header有8个字节,有24bit用来标识不同的二层网络,这样总共是1600多万个 vxlan。vxlan详解
- 配置方式:参考
1.使用 vxlan 配置集群时,因为 vxlan 利用 udp 包的 payload 封装二层 eth 包,mtu 值从1500变为1450。
2.vxlan 利用 udp 封包,etcd 配置 udp 使用8472端口接收数据,需要在所有节点放行8472 udp port 。
service 与 Pod 对应信息
1 | kubectl describe service nginx-test |
kubectl debug 查看路由走向与网络,进入 pod 10.42.0.65
1 | kubectl debug -it nginx-test-7646687cc4-n8s9s --image=busybox -- /bin/sh |
数据包走向分析,从10.42.0.65请求10.42.1.9
- 数据在 pod namespace network 中路由
ip为10.42.0.65的pod从自己的network namespace访问pod 10.42.1.9,根据10.42.0.65 pod network namespace的路由表,数据进入了10.42.0.65 pod的宿主192.168.205.4的network namespace中的linux bridge cni0。查看宿主机路由信息
1 | ip addr |grep 192.168.205.4 |
10.42.1.0/24网段的访问下一跳ip地址是10.42.1.0,用flannel.1设备发送。flannel.1设备就是 flannel 启动的时候根据vxlan类型网络在宿主上创建的,它属于vxlan设备,会完成对二层eth以太数据包到udp数据包的封装与拆封。其中的”.1”代表vxlan这个二层网络id号为1,也对应了vxlan网络在etcd里的配置。这个时候数据包源ip为10.42.0.65,目标ip为10.42.1.9,源mac为pod 10.42.0.65 network namespace中veth设备mac,目标mac为下一跳ip **10.42.1.0/32 **的mac。
- 查看 vtep 端点 mac 地址以及转发接口信息
查看 mac 地址信息:在pod 10.42.0.65的宿主192.168.205.4上通过arp表查询10.42.1.0/32的mac地址为 62:c8:a9:ce:ca:4e
1 | ip addr |grep 192.168.205.4 |
查看 mac 地址转发信息:由于flannel.1设备是vxlan设备,会有转发接口与它的mac对应,继续在pod 10.42.0.65的宿主192.168.205.4上查询flannel.1设备的mac转发接口。
1 | ip addr |grep 192.168.205.4 |
可以看到 flannel.1设备mac地址 62:c8:a9:ce:ca:4e 对应的转发接口为 192.168.205.3,代表flannel.1设备将会把原始二层数据包(源ip为10.42.0.65,目标ip为10.42.1.9,源mac为 pod 10.42.0.65 network namespace中veth设备mac,目标mac为10.42.1.0/32 mac)做为 upd 的 payload 发给 **192.168.205.3 **的 **8472 **端口。目标pod **10.42.1.9 **的宿主机确实是 192.168.205.3,而且其上的flannel.1设备同样会对8472端口的数据进行upd解包。
flannel.1 设备处理 udp 封包与解包
1
2
3
4
5
6
7
8
9ip addr |grep 192.168.205.4
inet 192.168.205.4/24 metric 100 brd 192.168.205.255 scope global dynamic enp0s1
route -n
Kernel IP routing table
Destination Gateway Genmask Flags Metric Ref Use Iface
0.0.0.0 192.168.205.1 0.0.0.0 UG 100 0 0 enp0s1
192.168.205.0 0.0.0.0 255.255.255.0 U 100 0 0 enp0s1
192.168.205.1 0.0.0.0 255.255.255.255 UH 100 0 0 enp0s1flannel.1 设备 udp 封包:从pod **10.42.0.65 **的宿主 192.168.205.4 的路由表得知发往 192.168.205.0/24 网段为直连路由,使用宿主网络设备 enp0s1 发送。所以对于:
- 外层udp包:源ip为192.168.205.4,目标ip为192.168.205.3,源mac为192.168.205.4 mac,目标mac为192.168.205.3 mac。目标端口为8472,vxlan id为1.
- 内层二层以太包:源ip为10.42.0.65,目标ip为10.42.1.9,源mac为pod 10.42.0.65 network namespace中veth设备mac,目标mac为10.42.1.0/32 mac
- 完成封包以后根据宿主路由表发向目标节点 192.168.205.3
flannel.1 设备 udp 解包:宿主机 **192.168.205.3 **接收到数据包后
目标节点192.168.205.3的8472端口接收到udp包之后,发现数据包里有vxlan id标识为1。由于linux内核支持vxlan,所以协议栈可以通过vxlan id判断这是一个vxlan数据报文,并且vxlan为1。然后找到宿主机器上vxlan id为1的vxlan设备处理,就是192.168.205.3上的flannel.1设备。
flannel.1收到数据之后开始对vxlan udp报文拆包,去掉upd报文的ip,port,mac信息后得到内部的payload,发现是一个二层报文。
对于这个二层报文继续拆包,得到里面的源ip是10.42.0.65,目标ip是10.42.1.9。
根据192.168.205.3上路由表,将数据由linux bridge cni0做本地转发,cni0 作为 linux bridge 利用 veth pair 将数据转发到目标 pod 10.42.1.9
1
2
3
4
5
6ip addr |grep 192.168.205.3
inet 192.168.205.3/24 metric 100 brd 192.168.205.255 scope global dynamic enp0s1
route -n
Destination Gateway Genmask Flags Metric Ref Use Iface
10.42.1.0 0.0.0.0 255.255.255.0 U 0 0 0 cni0宿主host的路由表的写入 与 flannel.1设备mac转发接口表的写入(fdb 转发)
因为所有的host都运行flannel服务,而flannel连接etcd存储中心,所以每个host就知道自己的子网地址cidr是什么,也知道在这个cidr中自己的flannel.1设备ip地址和mac地址,同时也知道了其它host的子网cidr以及flannel.1设备ip地址和mac地址。而知道了这些信息,就可以在flannel启动的时候写入到路由表和fdb中了,以 **192.168.205.4 **宿主为例:
1 | ip addr |grep 192.168.205.4 |
flannel overlay(vxlan 方式)总结
- 每个宿主都有名字为flannel.x的vxlan网络设备来完成对于vxlan数据的udp封包与拆包,upd数据在宿主的8472端口上(端口值可配置)处理。
- 数据从pod的network namespace进入到host的network namespace中。
- 根据host network namespace中的路由表,下一跳ip为目标vxlan设备的ip,并且由当前host的flannel.x设备发送。
- 根据host network namespace中的apr表找到下一跳ip的mac地址。
- 根据host network namespace中fbd找到下一跳ip的mac地址对应的转发ip。
- 当前host的flannel.x设备根据下一跳ip的mac地址对应的转发ip和本地路由表进行upd封包,这个时候:
- 外层udp包:源ip为当前host ip,目标ip为mac转发表中匹配的ip,源mac为前host ip的mac,目标mac为fdb中匹配ip的mac。目标端口为8472(可配置),vxlan id为1(可配置).
- 内层二层以太帧包:源ip为源pod ip,目标ip为目标pod ip,源mac为源pod mac,目标mac为host network namespace中路由表里下一跳ip的mac(一般为目标pod对应的host中flannel.x设备ip)。
- 数据包由当前host路由到目标节点host。
- 目标节点host的8472端口接收到udp包之后,发现数据包里有vxlan id标识.。然后根据linux vxlan协议,在目标宿主机器上找到与数据报文中vxlan id对应的vxlan设备,将数据交由其处理。
- vxlan设备收到数据之后开始对vxlan udp报文拆包,去掉upd报文的ip,port,mac信息后得到内部的payload,发现是一个二层报文。然后继续对这个二层报文拆包,得到里面的源pod ip和目标pod ip。
- 根据目标节点host上路由表,将数据由linux bridge cni0做本地转发。
- 数据由linux bridge cni0利用veth pair转发到目标pod。
- 每个宿主host的flannel服务启动的时候读取etcd中的vxlan配置信息,在宿主host的路由表和mac转发接口表fdb里写入相应数据。
3)flannel underlay 与 overlay 网络对比
- 都要求host宿主开启网络转发功能(net.ipv4.ip_forward = 1)。
- flannel underlay网络没有数据包的额外封包与拆包,效率会更高一些。
- 对于flannel underlay网络要求所有的worker node都在同一个二层网络里,从而完成目标pod的下一跳路由。即underlay网络worker node不能跨子网。
- flannel vxlan overlay 网络有封包与拆包,并且外层包都是 udp 包。因此 worker node只要三层路由可达就好,支持worker node能跨子网。
- flannel vxlan overlay网络内层包是二层以太包,基于linux vxlan设备
- flannel underlay网络和flannel vxlan overlay网络所有数据包都由操作系统内核空间处理,没有用户空间的应用程序参与。
参考
1、k8s 集群网络:
https://mp.weixin.qq.com/mp/appmsgalbum?__biz=MzI0MDE3MjAzMg==&action=getalbum&album_id=2123526506718003213&scene=173&from_msgid=2648393229&from_itemidx=1&count=3&nolastread=1#wechat_redirect
2、iptables 详解:
https://lixiangyun.gitbook.io/iptables_doc_zh_cn/
https://www.jianshu.com/p/ee4ee15d3658
3、Docker 网络类型:https://developer.aliyun.com/article/974008#slide-4
4、ipvs 工作模式原理:https://icloudnative.io/posts/ipvs-how-kubernetes-services-direct-traffic-to-pods/